Create MongoDB database models in Node.js

MongoDB is an open-source, cross-platform document store NoSQL database that helps us to store and retrieve data in form of a JSON-Like document. NoSQL is an alternative to our Relational Databases. NoSQL databases are useful when we work with a large set of data. MongoDB is one of the NoSQL databases.
Like other NoSQL databases, MongoDB also requires predefined schemas. MongoDB stores any type of data and also gives the flexibility of creating any number of fields in a document. They use embedded documents. This reduces the need for database joins that reduces cost.
💡Also learn how to feed an API through a React application that will work with GraphQL to provide data to MongoDB:
👉 To read more such articles, sign up for free on Differ.
1. Creating a Node.js Project
Create a new directory and initialize node with the command npm init.
mkdir helloworld
cd helloworld/
npm init -y
To run the node js server, we need to type node index.js in the terminal each and every time when I change anything in the code. I found it difficult. So I started using nodemon. This is a simple tool that automatically restarts the server when something has been changed in the code. The below command installs nodemon to our project.
npm install -g nodemonSetting up nodemon is so simple. Just replace node with nodemon. Now when you type nodemon index.js in the terminal, the server will run and when you change anything in the code, it automatically restarts the server.
Now just to make my server work on typing npm start, I am adding nodemon index.js in the start script section.
package.json
"scripts": {
   "start": "nodemon index.js",
   "test": "echo \"Error: no test specified\" && exit 1"
},
Now let’s create our server. Here we are creating our server using Express.js. Express JS is an open-source web framework for node JS. The below command installs express to our project.
npm install express --saveAfter Installing, just create a new file named index.js which will be our server file.
index.js
var express = require('express');
var app = express();app.get('/', function (req, res) {
  res.send('Hello World!');
});app.listen(8000, function () {
  console.log('Listening to Port 8000');
});
Now start the server, you should see hello world being displayed in the browser.
npm start2. Connecting to MongoDB database
To connect MongoDB to the Node JS project, you should have MongoDB installed in our local machine. Install it from MongoDB’s official website.
Also, install any one GUI tool of MongoDB. I am using one of them called NoSqlBooster.
After installing MongoDB, install mongoose which is an Object Data Modeling library for MongoDB and Node js. It manages relationships between data and provides schema validation. The command installs mongoose.
npm i mongooseNow let’s connect MongoDB to Nodejs with the help of mongoose. The connection can be achieved just by passing the MongoDB connecting string to the mongoose.
index.js
var express = require('express');
var app = express();
const mongoose = require('mongoose');//Routes
app.get('/', function (req, res) {
    res.send('Hello World!');
});//Database
mongoose.connect('mongodb://localhost/test', {useNewUrlParser: true});mongoose.connection.once('open',function(){
    console.log('Database connected Successfully');
}).on('error',function(err){
    console.log('Error', err);
})app.listen(8000, function () {
    console.log('Listening to Port 8000');
});
Now if the MongoDB server is working perfectly, the server will ping you with a successful message. If not it will throw the error.
3. Creating Models
After successfully connecting node with MongoDB, create a folder named Models where all Schemas will be kept. Inside the Models folder, create a file named emp.js. Inside this file, create a schema named empSchema and declare all the fields you want. Finally, export the schema.
Models/emp.js
const mongoose = require('mongoose');const empSchema = new mongoose.Schema({
  empName: {
    type: String,
    required: true,
  },  empEmail: {
    type: String,
    required: true,
  },
})module.exports = mongoose.model('Emp',empSchema)
Here for demonstration, we are sending data from the client as JSON. To do that, we need an Express middleware called Body-Parser. Install it with the bellow command.
npm install body-parserInside our server file, I am creating a route /add for inserting the employee data into the database.
Inside the route, just create an object emp. Then type emp.save() which inserts our data to the database.
index.js
var express = require('express');
var app = express();
const mongoose = require('mongoose');
const bodyParser  = require('body-parser');//Routes
app.use(bodyParser.json());
app.use(bodyParser.urlencoded({ extended: false }));
app.get('/', function (req, res) {
    res.send('Hello World!');
});app.post('/add', function(req,res) {
  const emp = new Emp({
    empName: req.body.empName,
    empEmail: req.body.empEmail,
  });
  emp.save().then(val => {
    res.json({ msg: "Employee Added Successfully", val: val })
  })
})//Database
mongoose.connect('mongodb://localhost/test', {useNewUrlParser: true});mongoose.connection.once('open',function(){
    console.log('Database connected Successfully');
}).on('error',function(err){
    console.log('Error', err);
})app.listen(8000, function () {
    console.log('Listening to Port 8000');
});
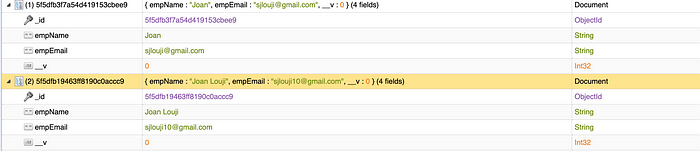
Make a post request to http://localhost:8000/add with empName and empEmail. If the request is valid, mongoose inserts the values to our empSchema. If not, mongoose throws us the error.

This is how my MongoDB database looks after inserting values.
Do check my previous blog, where I have explained about routing with Nodejs.
Feel free to contact me for any queries. Email: sjlouji10@gmail.com. Linkedin: https://www.linkedin.com/in/sjlouji/
Complete code on my GitHub:
Happy coding!
In Plain English 🚀
Thank you for being a part of the In Plain English community! Before you go:
- Be sure to clap and follow the writer ️👏️️
- Follow us: X | LinkedIn | YouTube | Discord | Newsletter
- Visit our other platforms: CoFeed | Differ
- More content at PlainEnglish.io